.svg "kettlogovectordkbluss (1)")
 Safe grain storage isn’t just about keeping harvests dry, it’s about protecting months of hard work and thousands of dollars in potential revenue. Farmers have to keep their grain free of rodents, bugs, mold, and more. They need structurally sound silos and bins, as well as proper aeration and temperature control.
Almost every farmer will tell you that moisture content and fluctuating temperatures are two of the biggest challenges farmers face when it comes to safe grain storage. In the warmer months, farmers must frequently analyze samples of their stored grain to ensure that it’s handling the heat. That ideal temperature for storing grain and preventing mold and insects is a range from 25°F to 60°F, but that can be hard to maintain when summer temperatures consistently top 80°F.
Most grain in the US is grown in regions where summers are often far hotter than 80°F, frequently topping 100°F. That means that farmers have to be incredibly careful about maintaining the moisture integrity of their storage solutions. Freshly harvested grain is especially challenging to store because of its higher moisture content and temperature.
During storage, grain naturally changes physically and chemically. Warmer, wetter grain respires in storage bins, which in turn creates additional heat and moisture. Consequently, that additional heat and moisture can lead to the development of hotspots, mold, and mycotoxins in the grain, all of which can lead to grain spoilage.
By following our advice on safe grain storage, you can learn how to mitigate the risks and losses associated with storing grain and ensure your supply will be stored safely for a long period of time. These three strategies will help you avoid the revenue loss associated with spoiled grain.
1. Prevent Grain Spoilage with Consistent Moisture Content and Temperature Monitoring
Uncontrolled moisture leads to grain spoilage and revenue loss. To keep your grain from losing profitability, it is critical to monitor moisture and temperature on a regular basis, throughout the storage period.
Basic recommendations include:
- Every two weeks, evaluate a number of grain samples to obtain a representative snapshot of your overall grain health.
- Measure and track the temperature readings, and be sure to make note of any drastic increases in grain temperature (5.5°C or 10°F per week).
- In addition to regularly checking grain temperature, be sure to measure your grain’s moisture content.
- Use high-quality, reliable moisture meters and thermometers to ensure the most accurate readings.
Drastic changes in temperature are indicative of increased respiration due to spoilage or the development of mold and/or hotspots, and each 10 degrees the grain temperature increases will reduce the allowable storage time by about half. Insect reproduction is also reduced at temperatures below 65 to 70 degrees Fahrenheit, so you’ll also want to keep grain as cool as possible to limit insect activity.
Checking your grain’s moisture content is important because measurements at harvest are likely to have changed due to:
- moisture gradients in the freshly-harvested kernel
- moisture entering storage bins
- changes in grain temperature.
Moisture content must decrease as the grain temperature increases, because if it doesn’t, you risk serious mold growth and grain deterioration.
When checking the moisture content of stored grain, make sure your measurement is accurate by warming the grain sample to room temperature in a sealed container or plastic bag before measuring the moisture content. Otherwise, you need to make sure your moisture tester automatically compensates for temperature.
Letting the kernel sit for 6 to 12 hours in a sealed environment allows grain moisture to reach equilibrium across the kernels, providing a more consistent and reliable reading. When cross-referenced with temperature, these moisture values will help in determining the length of time the grain is able to be safely stored.
Given these requirements, it’s critical to use a reliable grain moisture meter to provide the fast, accurate readings you need. Inaccurate moisture measurements can lead to serious consequences, including higher-than-necessary drying costs, excessive shrink, and grain spoilage.
2. Avoid Grain Loss by Ensuring Adequate Aeration
Because wet grains are known to respire and give off heat, you must control your grain temperatures by moving cool air through your grain storage bins. As a matter of fact, you should start aerating your grains as soon as they’re placed into storage.
Properly aerated grains can generally be stored safely about four times longer than non-aerated grains, so it’s important that you start the process right away when the grain is at its highest moisture content. This maximizes longevity.
As a general rule of thumb, aeration problems can be minimized by keeping grain temperatures within 10-15°F of the average outdoor air temperature, while also keeping grain temperatures below 60°F to control insect growth and activity
3. Improve Grain Storage Techniques by Using Safe Storage Charts
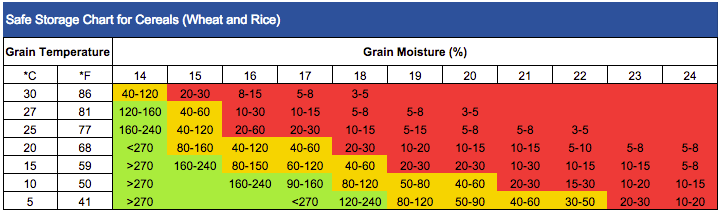
Need some help figuring out how long you can store your grains safely under their current conditions? Use the safe storage charts below to see recommendations based on grain temperature and moisture content for the length of time grain ought to be stored prior to suffering 0.5% dry matter loss.
Dry matter loss (DML) refers to loss of weight due to molds, sprouting, insect damage, and/or respiration during storage.
Table 1: Safe Storage Chart for Corn

Table 2: Safe Storage Chart for Canola
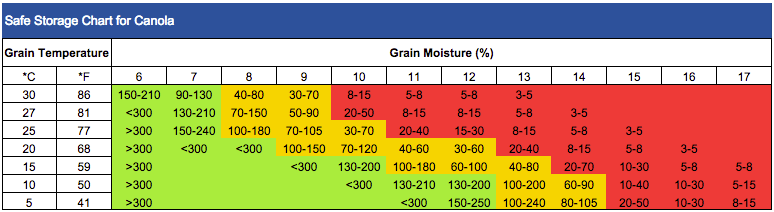
Table 3: Safe Storage Chart for Soybeans
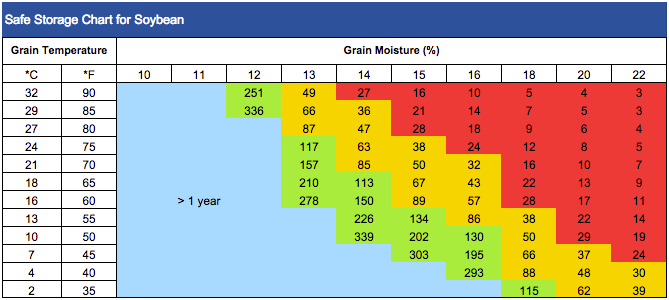
Table 4: Safe Storage Chart for Cereals (Wheat and Rice)
Safe Storage Charts. Digital image. Learn Grain Management. OPI, n.d. Web. 25 Aug. 2015.
Troubleshooting Grain Spoilage Issues
What if you’re doing everything “right,” but you’re still having issues with grain spoilage?
It’s incredibly frustrating to feel like you’ve done everything you can to manage grain spoilage, and yet you’re still experiencing problems.
One of the most likely culprits for this kind of ongoing issue is inaccurate moisture measurements. If you’re operating from bad data, you will adjust the grain storage conditions incorrectly. The three most common testing issues that farmers face are:
- Insufficient grain sampling
- Improper tester use
- Non-calibrated testing
- Low-quality testing tools
Problem #1: Insufficient Grain Sampling
One problem may be insufficient grain sampling.
When you collect a sample of your grain, where do you collect it? If you’re just scooping your sample off the top layer, you aren’t sampling enough.
Probe your storage in several locations and depths, going as deep as possible into the center. This will give you a better idea of the grain conditions throughout your bin. Make sure to test each sample separately so you can pinpoint the hotspots and mitigate spoilage problems.
Problem #2: Improper Tester Use
In order to get a reliable moisture meter reading, it’s important that you properly use the moisture tester.
Make sure the battery is healthy, as low batteries can cause inaccurate readings. Follow the manufacturer’s instructions for testing with that moisture meter, and make sure you know whether your tester has automatic temperature compensation.
Some testers require a separate measurement of grain temperature with a thermometer, and the addition or subtraction of a correction factor to the moisture reading.
Problem #3: Non-Calibrated Testers
Moisture meters should be inspected for accuracy on a regular basis. Most equipment dealers that sell and service moisture analyzers have a certified unit available for calibration, and it’s important that you compare at least three samples of your unit’s measurements against those from the certified unit at least once per year, before harvest.
If the difference for any sample is greater than 1.0 percentage point, or if the average difference for all samples at one moisture level is greater than 0.5 point, then your tester needs to be recalibrated.
Problem #4: Low-Quality Testing Tools
We all understand the importance of frugality in the agricultural industry. However, it’s important to invest in systems that will keep your operations running smoothly. Choosing a low-quality testing tool or moisture meter will ultimately create more expensive problems–far more than whatever you saved by buying the cheapest option on the market. There are even farmers who have purchased cheap meters from Temu and other international vendors, not realizing that the quality of those products is inconsistent at best and useless at worst.
How to protect your grain with Kett’s state-of-the-art moisture meters
Proper preparation and aeration, frequent grain monitoring processes, and the application of safe grain storage timeliness are all key components of a successful safe grain storage program.
Following these best practices will help you ensure continuous inventory levels, prevent spoilage, and maximize profitability for your business. To learn more about how Kett moisture meters can help you measure and track your stored grain moisture levels, fill out our online contact form to of our qualified engineers.